Many printouts in aACE can be edited by entering FileMaker's layout mode. For most instances, this editing involves "nudging" fields into place so they correctly print to forms (e.g. checks, vendor 1099s, etc). Likewise, different printers sometimes provide different results, so additional adjustments may be required.
To edit print layouts, you must belong to a user group where the data group is set to Management or Programmer_Admin, and also have access to aACE Preferences.
Note: aACE Complete customers may find that semi-annual maintenance updates overwrite some aspect of a customized print layout. We recommend keeping precise and thorough notes about your customizations to make it easy to recreate them.
Editing a Print Layout
- Navigate to Menu > System Admin > Preferences > Database Management.
- Click the Printouts dropdown list and select the printout you want to adjust.
- Click the Pencil icon (
 ).
). - At the dialog box, click OK, then press the appropriate key combination to enter Layout Mode (⌘-L or Ctrl-L).
- Make the necessary layout adjustments (see below).
- Close the layout editing window.
The first time you change a layout, FileMaker prompts you to save the changes. At that dialog, you can mark the flag to save changes automatically.
 ).
).Common Layout Adjustments
Below are some of the most common needs for editing a print layout (e.g. for checks, orders, invoices, etc).
Re-Positioning Fields
Often you will merely need to nudge the data fields slightly to get them into place — open the print layout for editing, then click the data field:
- Adjust the field placement by using the keyboard arrow keys
- Adjust the field size by clicking an anchor-square and dragging the border larger or smaller
Re-Sizing Fonts
You can change the font size on each data field so the information fits better on your print items. (Note: Changing the font size will often require re-positioning the field.) Open the print layout for editing, click the data field, then display the Inspector pane by pressing ⌘-I:
- Click the Styles icon (
 ), then select a different font setting (e.g. Field 6pt Left).
 - Click the Appearances icon (
 ), then change the Text and Paragraph settings (e.g. font, size, alignment, etc).
 ), then select a different font setting (e.g. Field 6pt Left).
 ), then change the Text and Paragraph settings (e.g. font, size, alignment, etc).
Aligning the Address Window Guide with Envelope Windows
Some print layouts now include a blue guide that represents an envelope address window:
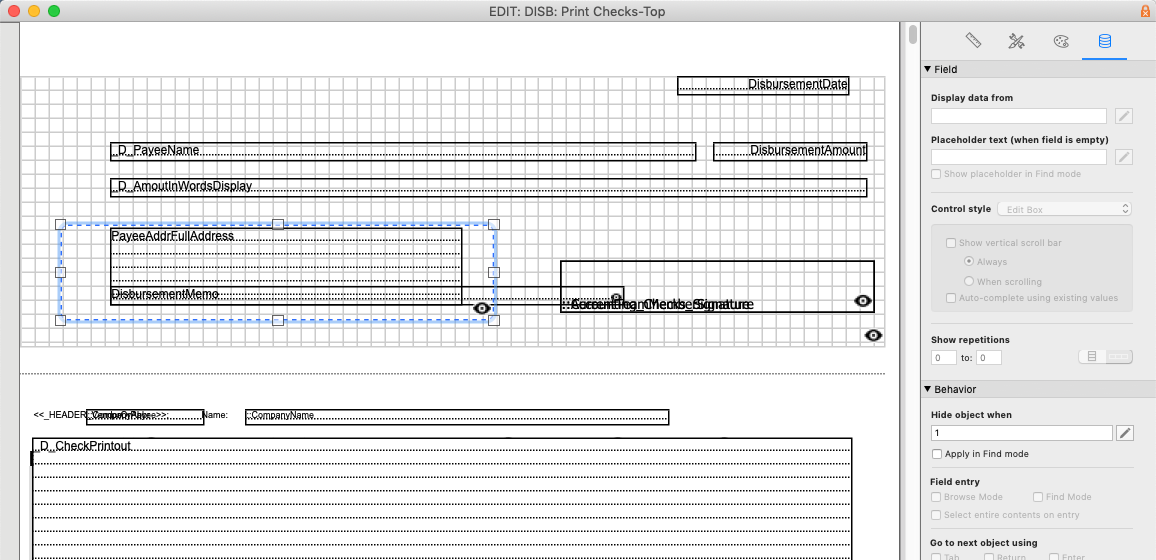
By default, this blue guide will not print. However, you can change this temporarily to help match the guide to your actual envelopes:
- Open the print layout for editing, then click the blue guide's border. (Note: You may have to click the border multiple times to shift focus to the guide itself.)
- Display the Inspector pane by pressing ⌘-I, then click the Data icon (
 ).
). - In the Behavior section, change the Hide object when number from '1' to '0', then close the layout window.
- Test your changes by printing a sample on white paper, placing it in an envelope, and noting any differences between the envelope window and the guide.
- At the print layout again, change the Hide object when number back to '1'.
- Adjust the guide as needed to match your envelopes, then re-position the address block to fit within the guide area.
- Close the layout window.
 ).
).Helpful Hints
- Preprinted papers (e.g. checks, 1099s, etc.) often require adjustments. Test your changes by printing a sample on white copy paper, then overlaying the preprinted paper with the sample, and holding it up to a light. This usually allows you to see where the text will be placed, identifying any overlapping data without ruining a preprinted sheet.
- To find additional resources that help with editing layouts, search the Internet for "FileMaker Layout Mode".
- The default DPI on Mac is 72 and on Windows it is 96. This means nudging a screen object 1 pixel equates to approximately 1/72 inch on Mac and 1/96 inch on Windows.
- A printout may require several "nudge" adjustments until it prints exactly as you desire. Careful persistence will ensure you get the best results.
- For complex adjustments to existing printouts or for new reports, contact aACE Software or your aACE partner.