This guide explains how to fully set up a new aACE user. It is intended for system administrators.
Each person on your staff who will be interacting with aACE needs to have a team member record; however, some of these may not require a user record. Fully setting up a person as a new aACE user requires:
- Creating a team member record for the user.
- Assigning the team member to the respective team(s), if needed.
- Assigning the team member to a user group.
- Notifying the user.
You can also set up multiple users at one time (see below).
Note: Some team members conduct their work outside of aACE and only use the Email-based Timesheet feature or the aACE Job Shop App, they may not need to log in to aACE and may not need a user record.
Create a Team Member Record
Before you create a new record for a user, we recommend searching the existing records to make sure a team member record doesn't already exist.
- Navigate from Main Menu > Internal > Team Members.
- In the menu bar, click New.
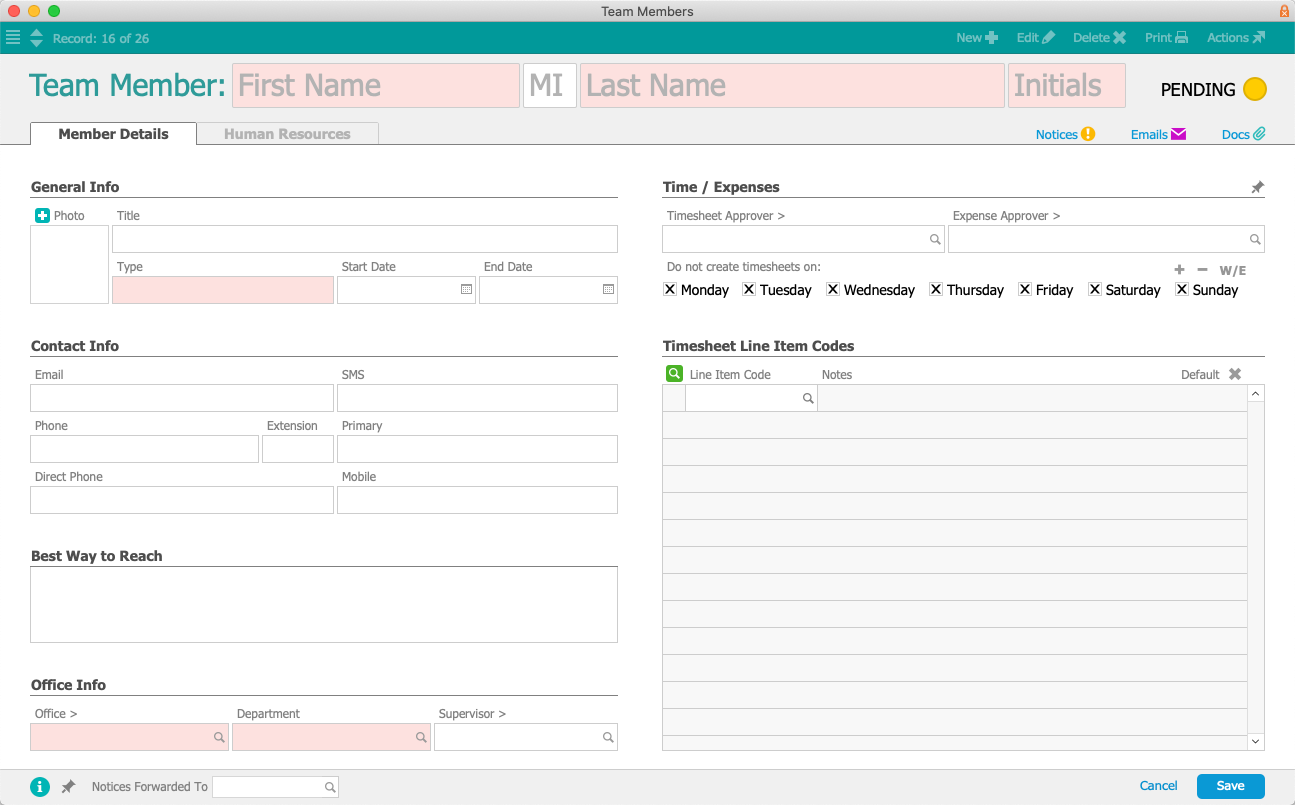
- On the new record, enter the team member's information:
- Type — This field does not carry any system logic. You can enter any useful grouping convention (e.g Resource, Contractors, Freelancers, Part Time, Full Time, Mobile App Users, etc).
- Office / Department — Control which records the team member will be able to view.
- Timesheet Line Item Codes — Allow you to specify which labor codes will display when this team member fills out a timesheet. The team member will be able to enter other labor codes manually. You can mark one of these codes as the default.
- Timesheet Approver — Designates who will be notified that this team member has submitted a timesheet for approval.
- Days for Automatic Timesheet Creation — Marking a flag instructs aACE to not automatically generate a timesheet that day. Team members will be able to manually create timesheets any day of the week.
- Click Save and Activate.
Note: To keep the team member record in Pending status, click Not Yet.

After a team member record is created, most users can view the Member Details tab. Data on the Human Resources tab can only be viewed by team members who belong to a user group with the Team Members Human Resources flag marked. If needed, click the Human Resources tab and click Edit to enter other details:
- Multiplier — A number that payroll companies often provide for use with the Pay Rate to calculate the Bill Rate (i.e. the rate that includes salary, wages, benefits, taxes, and charges for any other services the payroll company is providing).
- Freelancer — Identifies the user as a freelancer.
- Home Address
- Signature — Upload a graphic that aACE can insert on documents.
Assign the Team Member to Team(s)
Assigned teams typically govern which notifications the team member will receive. Edit any applicable team(s) and add the new team member.
Assign the Team Member to a User Group
aACE uses a security model where user groups are granted privileges, then team members are assigned to those groups.
- Navigate from Main Menu > System Admin > User Groups.
- Click the correct user group for the team member, then click the Team Members tab.

- Click the Search icon (
 ) above the list of current team members.
 - At the Team Members Selector, use the Quick Search bar to locate the team member, then click the name to move it to the list of Selected Members.
- Click Save.

 ) above the list of current team members.
Back at the Team Members sub-tab, verify that the User flag is marked for the new team member. Optionally, you can click Edit again and modify the Account Name that the user will enter when logging into aACE.
Notifying a New User
Be sure to provide the new user with all the other required resources, then send them an email about accessing aACE on their computer. Provide the account name and system default password. Explain that when they log into aACE, the system will prompt them to create a unique password.
Importing a Batch of New Users
You can leverage the import process in the Team Members module. Export the list view to get an Excel spreadsheet of the team member fields, then add the needed data to the spreadsheet for the new users and import it. Note: You can specify User Groups on the spreadsheet to automatically assign team members to those groups.