Warning: Before you begin this step of entering beginning balances, it is essential that you read this guide in its entirety — you must understand the process before beginning the process.
To ensure that your results will be correct, we also recommend that you prepare a backup system and conduct a 'dress rehearsal' of the process.
The following tasks comprise the main effort for entering data needed to establish your beginning balances. You only need to complete the tasks for data that your organization needs to start conducting business operations in aACE. You can skip or defer other steps.
This list represents the proper order in which transactions should be imported. You must go through the steps in order because earlier steps create debits and credits that are resolved by the later steps.
Click the links here to jump to the relevant details in this guide:
- Accounts Receivable Transactions
- Importing Sales Orders (Optional)
- Importing Invoices (A/R Balance)
- Creating Records for Receipts in Transit (Optional)
- Creating Records for Bank Deposits in Transit (Optional)
- Accounts Payable Transactions
- Entering In-Process Purchase Orders (Receiving Expectations — Optional)
- Importing Purchases (A/P Balance)
- Creating Records for Disbursements (Optional)
- Inventory Balances (Optional)
- Other Transactions (Optional)
As explained in our help guide about importing transaction data, you must first import (or manually create) the header records for each type of record listed above. Then you can import the item records. For additional help, see the section at the end of this guide about Best Practices for Importing Beginning Balances Data.
1. Accounts Receivable Transactions
1.A. Importing Sales Orders (Optional)
You can import data for sales orders if your organization needs active or historical orders present in your system. Note that sales orders do not affect your Income Statement.
Importing Order Header Records
Navigate from Main Menu > Order Management > Orders to export an orders import spreadsheet.
The following columns on the orders import spreadsheet are required:
- Order ID — Must be a unique value
- Billing Company — Must be a value currently in your aACE system
After you have prepared the spreadsheet of your order header data, import the transaction data. (For details, see our guide on Importing Transaction Data.)
At this point, the imported order records will have no data in the Order Items section. They are left in Pending status so you can import order items to each order.
Importing Order Items
Navigate from Main Menu > Order Management > Details > Order Items to export an order items import spreadsheet. The following columns on the order items import spreadsheet are required:
- Order ID — Must be a record in Pending status currently in your aACE system
- Line Item Code — Must be a value currently in your aACE system
After you have prepared the spreadsheet of your order items data, import the transaction data. (For details, see our guide on Importing Transaction Data.)
When you import order items, aACE populates the Order Items section of the corresponding invoices.
Confirm Your Results
After you have imported your order header data and items data, compare the list and detail views of all orders with the information you have migrated from your previous system.
If these do not match, you must reconcile the two systems before continuing.
Open the Imported Records
At the Orders module list view, click Actions > Open Orders in List.
1.B. Importing Invoices (A/R Balance)
The exact data you need to focus on when importing invoices depends on your business requirements. Some organizations find it easier to manually enter their few invoices, while others may need to import a larger number of records. Some companies require only historical balances, while others need to have historical and open invoices (see below for details).
Importing Invoice Header Records
Navigate from Main Menu > Accts Receivable > Invoices to export an invoices import spreadsheet. The following columns on the invoices import spreadsheet are required:
- Invoice ID — Must be a unique value
- Invoice Date
- Department Abbr — Must be a value currently in your aACE system
- Assigned To Initials — Must be a value currently in your aACE system
- Company Abbr — Must be a value currently in your aACE system
- Tax Profile Abbr — Must be a value currently in your aACE system
After you have prepared the spreadsheet of your invoice header data, import the transaction data. (For details, see our guide on Importing Transaction Data.)
At this point, the imported invoice records will have no data in the Invoice Items section. They are left in Pending status so you can import the invoice items to each invoice record.
Importing Invoice Items
Navigate from Main Menu > Accts Receivable > Details > Invoice Items to export an invoice items import spreadsheet. The following columns on the invoice items import spreadsheet are required:
- Invoice ID — Must be a record in Pending status currently in your aACE system
- Line Item Code — Must be a value currently in your aACE system
After you have prepared the spreadsheet of your invoice items data, import the transaction data. (For details, see our guide on Importing Transaction Data.)
When you import invoice items, aACE populates the Invoice Items section of the corresponding invoices.
Confirm Your Results
After you have imported your invoice header data and items data, confirm the following values:
- Your balance sheet A/R balance matches the aACE balance for all open invoices.
To display this value in aACE, navigate to the Invoices module list view, then click the footer link to Find Open Invoices. Review the totals at the bottom of the list. (Note: You can also find this value in the GL Accounts module by reviewing the Accounts Receivable account.) - Your aACE A/R Aging Report matches your previous system's A/R Aging Report.
To display this report in aACE, navigate to the Invoices module list view, then click Print > A/R Summary Aging Report - All Invoices.
If either of these criteria are not true, you must reconcile the two systems before continuing.
Open the Imported Records
At the list view, click Actions > Open Invoices in List.
Three Options for Importing Invoice Data
You can use one of the following three approaches for organizing your invoice transaction data.
1) Import Current Invoices with Their Historical Balances
Many companies only need to transfer open invoices with the customer's current balance due. They do not need to transfer every line item code, partial payment, credit memo, and closed invoice.
For this scenario, use the Historical Balance column on the aACE template for importing invoices. In the Historical Balance column, enter the balance due. 
When aACE imports the spreadsheet, it updates the invoice header record with a single line for the HIST line item code and the balance due. These balances will show up on your A/R Aging Reports.
Note: The HIST line item code is a default LIC included in every aACE system. It is typically set up with a Revenue Account and Cost Account set to a default GL account titled 'Historical Balances Clearing Account'. Your system administrator can change the GL account used on the HIST LIC or can even assign a completely different LIC to be used for this type of import (Accounting > Preferences > Data Entry > Misc Line Item Codes > Historical Balances).
2) Import Only Sales History
Some companies only need data to help answer questions and fill in sales reporting.
For this scenario, use the Historical column on the aACE template for importing invoices.
In the Historical column, assign a Boolean value to identify the invoice status:
- Historical invoice — Positive value (e.g. True, T, Yes, Y, 1)
- Current invoice — Negative value (e.g. False, F, No, N, 0)
When aACE imports the spreadsheet, it marks each historical invoice with a banner. You can then import the invoice items data to the invoice header records. When you open these invoices, aACE will automatically close them. They will carry no balance, have no associated GL entries, and display no info on the A/R Aging Reports.
Because this functionality applies to the invoice header record, an invoice cannot be partly historical. This makes it easier to reconcile the cumulative balance for open invoices against the GL Accounts value for Accounts Receivable.
Using the Historical column can make your go-live process easier because it means you can first import only data about open invoices. Less data in the system at go-live means fewer moving parts and less to audit. A few months later, you can import the historical invoices data.
3) Combined Import
Some companies may need to import all invoice data at one time.
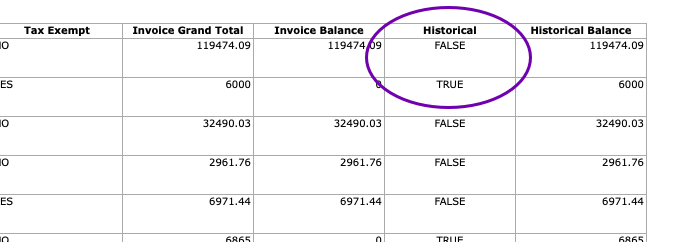
For this scenario, include all invoices on your aACE template for importing invoices, including balance values as well as a value for the Historical column.
Note: You can specify True or False in the Historical column cells manually or you can set up a calculation in the spreadsheet:
- If the Invoice Balance is zero, the line is historical — Enter 'True' in the Historical column.
- If the Invoice Balance is not zero, the line is not historical — Enter 'False' in the Historical column.
1.C. Creating Records for Receipts in Transit (Optional)
At your Go-Live date, there may be receipts you have received, but which have not cleared. The number of receipts in transit at Go-Live is typically small. This is especially the case if you have been preparing for Go-Live by sending invoices earlier than usual or by deferring them.
To have an accurate go-live reconciliation, you need to create records in aACE for receipts in transit.
- Navigate from Main Menu > Accts Receivable > Receipts.
- Click New > Other.
- Enter the amount of your first receipt in transit (and other necessary info, including Company, Payment Method, etc).
- If needed, back-date the default payment date.
- Select the desired GL Account for the receipt (e.g. Historical Balances Clearing Account) and enter the matching amount.
- Click Save and Post.
After you have entered the first receipt in transit, you can duplicate that record (Actions > Duplicate Receipt > Duplicate) and repeat the preceding steps for additional checks in transit.
Importing Receipts
If you have a large number of checks in transit, it may be more efficient to use the Receipts module Actions options to create a spreadsheet of your receipts, then import that data.
1.D. Creating Records for Bank Deposits in Transit (Optional)
At your Go-Live date, it is uncommon to have checks on hand, recorded in your accounting system, but not deposited in the bank. This is especially the case if you have been preparing for Go-Live by sending invoices earlier than usual or by deferring them. You may be able to avoid deposits in transit entirely and eliminate this step.
Deposits typically involve a two-step process. You receive multiple customer receipts for varying amounts. Then you take those checks to the bank and make a single deposit for the total amount. The Deposits module parallels this process. It creates a single general journal entry for the total amount of several receipts, moving funds from your Undeposited Funds accounts to your cash accounts.
Recording a Deposit in Transit
At the Receipts module, click New > Deposit, then fill out the needed info. Create a separate deposit entry for each deposit source. For example, you should record the deposit of cash from a POS system separately from recording credit card payments that are on the way.
Recording Multiple Deposits at the General Journal
If you have a large number of deposits in transit, it may be more efficient to use the General Journal module Actions options to create a single record that will help you reconcile deposits in transit.
- Navigate from Main Menu > Accounting > General Journal.
- Click New > Journal Entry.
- For the record title, enter "Deposits in Transit" (or similar).
- In the Entry Items section:
- Enter a line for the debit: Specify the GL Account as a cash/checking account with the total deposit value in the Debit field.
- Enter a line for the credit: Specify the Historical Balances Clearing Account (or equivalent) with the total deposit value in the Credit field.
(Note: Because this value is not coming from undeposited funds, there is no balance in undeposited funds account.)
- Click Save and Post.
2. Accounts Payable Transactions
2.A. Entering In-Process POs (Receiving Expectations)
You can import data for purchase orders if your organization needs active or historical POs present in your system. Note that POs do not affect your Income Statement (for details, see section below on Splitting In-Process POs).
Importing Purchase Order Header Records
Navigate from Main Menu > Accts Payable > Purchase Orders to export a POs import spreadsheet.
The following columns on the POs import spreadsheet are required:
- Purchase Order ID — Must be a unique value
- Purchase Order Date
- Vendor Company Abbr — Must be a value currently in your aACE system
After you have prepared the spreadsheet of your order header data, import the transaction data. (For details, see our guide on Importing Transaction Data.)
At this point, the imported PO records will have no data in the PO Items section. They are left in Pending status so you can import items to each PO.
Importing Purchase Order Items
Navigate from Main Menu > Accts Payable > Details > Purchase Order Items to export a PO items import spreadsheet. The following columns on the PO items import spreadsheet are required:
- Purchase Order ID — Must be a record in Pending status currently in your aACE system
- Line Item Code — Must be a value currently in your aACE system
After you have prepared the spreadsheet of your PO items data, import the transaction data. (For details, see our guide on Importing Transaction Data.)
When you import PO items, aACE populates the PO Items section of the corresponding invoices.
Confirm Your Results
After you have imported your PO header data and items data, compare the list and detail views of all POs with the information you have migrated from your previous system.
If these do not match, you must reconcile the two systems before continuing.
Open the Imported Records
At the list view, click Actions > Open Purchase Orders in List.
Splitting In-Process POs
In-Process POs can reflect three situations which should be handled differently. They can be handled similarly to partially paid purchases (see below). The general guideline is minimize 'mid-stream' transactions. Look for opportunities to split things up and/or clear balances prior to entering your beginning balances.
Unreceived and Unpaid Goods
PO's in aACE that reflect fully unreceived and unpaid quantities have no accounting transactions. This means that when you import POs, you can divide received inventory from outstanding inventory. For example, suppose your legacy system included a PO for ten widgets with a balance of four remaining to be received. In aACE, you could simply create a new PO for only those four widgets.
Unreceived and Paid Goods
If your legacy system includes unreceived goods that you have paid a deposit for, those deposits need to be recreated in aACE as deposit purchases using the DEPOSIT line item code.
If your legacy system includes purchases for unreceived goods that you are not treating as deposits (i.e. not hitting an asset account), you must devise a strategy to account for these.
Received and Unpaid Goods
If your legacy system includes received goods that you have not entered a bill for, simply create a new PO in aACE. However, set the Delivery Type field to "Not Applicable". This prevents aACE from generating a shipment record and accrued inventory entries. After you receive the vendor's bill, create the purchase in aACE also.
2.B. Importing Purchases (A/P Balances)
Importing purchases can be seen as the mirror-opposite of importing invoices. The exact data you need to focus on when importing invoices depends on your business requirements. Most businesses find it effective to import a single list of open purchases showing only the open balance.
Importing Purchase Header Records
Navigate from Main Menu > Accts Payable > Purchases to export a purchases import spreadsheet.
The following columns on the purchases import spreadsheet are required:
- Purchase Date
- Department Abbr — Must be a value currently in your aACE system
- Assigned To Initials — Must be a value currently in your aACE system
- Company Abbr — Must be a value currently in your aACE system
- Vendor Invoice ID
- Vendor Invoice Date
After you have prepared the spreadsheet of your purchases header data, import the transaction data. (For details, see our guide on Importing Transaction Data.)
At this point, the imported purchase records will have no data in the Purchase Items section. They are left in Pending status so you can import items to each purchase.
Importing Purchase Items
Navigate from Main Menu > Accts Payable > Details > Purchase Items to export a purchase items import spreadsheet. The following columns on the purchase items import spreadsheet are required:
- Purchase ID — Must be a record in Pending status currently in your aACE system
- Line Item Code — Must be a value currently in your aACE system
- Description
After you have prepared the spreadsheet of your purchase items data, import the transaction data. (For details, see our guide on Importing Transaction Data.)
When you import purchase items, aACE populates the Purchase Items section of the corresponding purchases.
Confirm Your Results
Once you have completed this step, confirm that:
- Your previous system balance sheet A/P balance matches the aACE balance for all open purchases — From the Purchases module, click the footer link to Find Open Purchases, then review the totals at the bottom of the list.
- Your previous system A/P aging report matches the aACE A/P aging report — From the Purchases module list view, click Print > A/P Summary Aging Report - All Purchases.
If either of these criteria are not true, then you must reconcile the two systems before continuing.
Open the Imported Records
At the list view, click Actions > Open Purchases in List.
Using Historical Balances for Open Purchases
As described above with invoices, when you set up the purchase headers import template, you can use the Historical Balance column.
If you enter a value in this column, you do not need to enter a value for the Purchase Order ID. Instead, the imported purchase record will include a single HIST line item code showing the value you entered as the current balance due. This feature can streamline the beginning balances process by removing the need to import purchase item details. It also makes it easy to identify any balances that need to be reversed.
We recommend using non-HIST codes only for new purchases that are not in your legacy system. For example, suppose you had an open rent purchase of $1,000.00. You should enter it using the HIST instead of the RENT line item code. The true expenses (e.g. RENT for $1,000.00) will be reflected in the beginning balance entries you create later.
Note: In contrast, the Historical column is not currently part of the purchases import functionality. Companies going live on aACE have rarely requested to have all purchasing history.
Splitting Partially Paid Purchases
As described above with purchase orders, try to minimize 'mid-stream' transactions.
We recommend that you clear the balance prior to going live. If that is not possible, we recommend that you split these transactions to separately record the completed portion and the outstanding portion. This typically involves 1) manually adjusting and closing the original, partially paid record in your previous system, then 2) creating a new purchase that reflects only the outstanding balance in aACE. This way the original purchase is closed and the new purchase does not have a partial balance.
For example, suppose your previous system included a purchase that was initially for $10,000.00. That purchase currently had a balance of $4,000.00 remaining. You would first adjust the original purchase down to $6,000.00 and close it. Then you could import a new purchase in aACE for the remaining $4,000.00.
2.C. Creating Records for Disbursements
At your Go-Live date, there may be checks you have sent, but which have not cleared. The number of disbursements in transit at Go-Live is typically small. This is especially the case if you have been preparing for Go-Live by sending out checks earlier than usual or by deferring them.
To have an accurate go-live reconciliation, you need to create records in aACE for disbursements in transit.
- Navigate from Main Menu > Accts Payable > Disbursements.
- Click New > Other.
- Enter the amount of your first disbursement in transit (and other necessary info, including Company, etc).
- If needed, back-date the default payment date.
- Select the desired GL Account for the disbursement (e.g. Historical Balances Clearing Account) and enter the matching amount.
- Click Save and Post.
After you have entered the first disbursement, you can duplicate that record (Actions > Duplicate Disbursement > Duplicate) and repeat the preceding steps for additional disbursements.
Importing Disbursements
If you have a large number of disbursements in transit, it may be more efficient to use the Disbursements module Actions options to create a spreadsheet of your disbursements, then import that data.
Confirm Your Results
After you have imported your disbursements header data and items data, compare the list and detail views of all disbursements with the information you have migrated from your previous system.
If these do not match, you must reconcile the two systems before continuing.
3. Importing Inventory Balances
If you do not track inventory or do not need inventory values to start business operations, skip to the next step.
You can add inventory to your aACE system with a beginning balance inventory adjustment.
3.A. Creating an Inventory Adjustment Record
Manually Creating an Inventory Adjustment Header Record
We recommend that you manually create and save a Beginning Balance-type inventory adjustment with the following settings.
- Title — Beginning Inventory Balances (or similar)
- Credit GL Account — Historical Balances Clearing Account (or the equivalent for your chart of accounts)
Warning: Do not specify an asset account. Inventory adjustment items will debit an asset account and reverse the inventory value on the GL back to zero. - Adjustment Items — You can enter these items in two ways:
- Manual Process — Enter the needed LICs, bins, quantities, lot numbers, serial numbers, etc by hand, then save and post the adjustment.
- Import Process — Do not type in adjustment items data. Instead, save the adjustment record and leave it in Pending status. Then follow the steps below for importing inventory adjustment items.
Importing Inventory Adjustment Items
Navigate from Main Menu > Inventory > Details > Inventory Adj Items to export an inventory adjustment items import spreadsheet. The following columns on the inventory adjustment items import spreadsheet are required:
- Inventory Adj ID — Must be a record in Pending status currently in your aACE system
- Line Item Code — Must be a value currently in your aACE system
After you have prepared the spreadsheet of your inventory adjustment items data, import the transaction data. (For details, see our guide on Importing Transaction Data.)
When you import inventory adjustment items, aACE populates the Adjustment Items section of the corresponding inventory adjustments.
Confirm Your Results
Once you have completed this step, confirm that the value in the GL Account for Finished Goods matches your previous system balance sheet.
If this criterion is not true, then you must reconcile the two systems before continuing.
Open the Imported Records
At the inventory adjustment detail view, click Actions > Post Inventory Adjustment.
3.B. Alternative Method — Using the aACE Inventory Counter Mobile App
If it is enabled with your system, you can use our mobile app to count your inventory. Then you can upload the count into aACE. This generates a Count-type inventory adjustment in Pending status.
After that inventory adjustment is uploaded, you must convert the Count-type inventory adjustment to a Beginning Balance-type inventory adjustment:
- Navigate from Main Menu > Inventory > Inventory Adjustments.
- Locate the pending inventory adjustment uploaded from the Inventory Counter app.
- At the detail view, click Actions > Duplicate Inventory Adjustment as....
- Change the Type field to Beginning Balance.
- Verify the correct Credit GL Account, LICs, and quantities.
- Click Save and Post for the Beginning Balance inventory adjustment.
- Delete the pending Count-type inventory adjustment.
Confirm Your Results
Once you have completed this step, confirm that the value in the GL Account for Finished Goods matches your previous system balance sheet.
If this criterion is not true, then you must reconcile the two systems before continuing.
4. Entering Other Transactions (Optional)
To ensure an accurate bank statement reconciliation, you may need to enter or import other records. The consistent layouts and processes in aACE make it easy to transfer these additional transactions from your previous system.
Best Practices for Importing Beginning Balance Data
aACE provides robust tools for importing records. There are important details to bear in mind for importing transactions such as invoices and purchases. And importing beginning balance data involves a few additional best practices. Preparing for the import process typically focuses on making sure the data from your existing system is aligned with aACE fields. Use these best practices to help make sure the process goes smoothly.
Historical Accuracy
Keep transactions as historically accurate as possible — especially the dates. If dates are not correct, your aging reports will not be correct. In addition, accurate dates make it easier to locate the same transaction in systems that use different record IDs, which can help with auditing data.
Record IDs
aACE import templates are flexible because aACE generates a unique record ID for each imported record. This helps ensure ensure correct data mapping for the rest of the import process. It means you can populate the Record ID field on your import template with any numbering or naming formats, including ones used by your old system. Using an ID format from a legacy system can be helpful because related records will often reference those ID codes (e.g. a shipment record will often reference the order record ID).
Company Names
The Company Abbr field on import templates also provides extra flexibility. aACE can match records to company names, company abbreviations, or company ID numbers. You can identify customers and vendors either by their company names or by your own abbreviations.
Title Columns
Some import spreadsheets include the Title column. This maps to the Title field in aACE, which is a text field that displays prominently on both list views and detail views. You can use this column to highlight notes about related records from your previous system(s).
For example, suppose a company was importing invoices, but they were updating their record IDs to a more efficient format. They could populate the Invoice Title field with customer order numbers using the old format. This would help team members during the transition to the new aACE system.
Resolving Import Validation Errors
During an import, aACE validates the incoming data against relevant requirements. If a point of data fails the validation, aACE prompts you to halt the import process and review the discrepancy. It generates a copy of your import spreadsheet, adding a column with details about each error. This guidance can help you successfully resolve import validation errors.