This guide explains how to conduct file maintenance on an aACE server. It is intended for system administrators.
aACE partners can prevent problems with system reliability or performance by performing file maintenance periodically. We recommend scheduling and performing file maintenance on a given client aACE system at least every six months.
Scheduling File Maintenance
Coordinate with the client and settle on a block of time when aACE can be taken offline. This block of time should:
- Extend at least five hours — Depending on the size of the system's Data file, the maintenance process can take from fifteen minutes to several hours. In most cases, five hours is sufficient.
- Be scheduled when no users will be signed into aACE — After business hours, on a weekend, or over a holiday.
- Include clear expectations of when the client will need their system back online — For example, if you plan to complete file maintenance on a Sunday afternoon, but the client says they don't need the system back up until Monday at 6:00 AM, you have a larger, safer window to complete the process.
Performing File Maintenance
Prior to the scheduled time, send the client a reminder that you will be taking their aACE system offline to begin the file maintenance process.
Starting Maintenance
At the scheduled time, access the client's aACE server and login to the FileMaker Server Admin Console. Close all database files and enter a notice for any users still logged into aACE to log out of the system:
aACE is being taken offline for maintenance. It will be back online before <start time and day>.
Stop the FM Server. After the FM Server has fully stopped, take a pre-maintenance backup using the following steps:
- Navigate to FileMaker Server > Data > Databases.
- Create a .7z archive of the full aACE system using Keka (Mac) or 7Zip (Windows). (For details, see section below on creating compressed archives.)
- Name the archive using this format: <YYYY_MM_DD_PartnerAbbr_ClientName>_PreMaintBackup.
- Move the pre-maintenance backup to the Desktop to be uploaded later on in the process.
Next, complete these steps to perform file maintenance on the necessary files:
- Navigate to FileMaker Server > Data > Databases.
- Rename the aACEv5v0_Data file by adding a hyphen as a suffix (e.g. “aACEv5v0_Data-”).
- Open FileMaker Pro on the server.
- At the menu bar, click File > Recover…, and select the renamed “aACEv5v0_Data-” file.
- At the naming dialog:
- Enter the name “aACEv5v0_Data” (i.e. identical to the original file name)
- Mark the flag to 'Use Advanced Options'.
- Click Specify.
- Clear the flag to 'Delete cached settings (page setup, sort order, etc.)'.
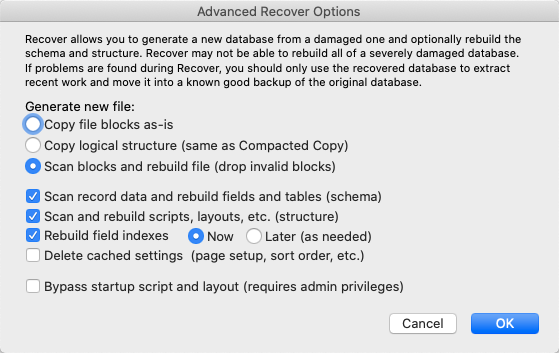
- Click Save.

The file recovery process begins and may run for several hours, depending on the size of the aACEv5v0_Data file.
When the recovery process finishes, a dialog displays the results. Occasionally a message of “Items modified: 1” will be included on the dialog, but this does not indicate a problem.
Repeat the steps above on these additional three files:
- aACEv5v0_Data_Logs — This file may also take a longer time to complete, depending on the size of the file.
- aACEv5v0_Interface — Typically completes within ten minutes.
- aACEv5v0_Scripts — Typically completes within ten minutes.
Mac File Permissions
On Mac servers, you must also ensure that all the newly recovered files have exactly the same file permissions as the other .fmp12 files in the Databases folder:
- Open the Databases folder's Information dialog.
- At the Sharing & Permissions tab, click the Lock icon in the bottom-right corner to allow changes to be made.
- Click the Gear icon, then select “Apply to enclosed items…“.
- Click OK.
Confirm Sufficient Storage Space on Server
At this point, you should confirm that the server's primary hard drive and the hard drive used for storing backups (if configured) both have sufficient storage space to continue running smoothly. If the remaining hard drive space on either drive is less than 25 GB, you should find a way to clear up space or expand the applicable drives so that they have at least 25 GB.
Options to clear up space include:
- Remove unneeded files from the server's Desktop and Downloads folder. This has the added benefit of making the server appear less cluttered.
- Empty the Trash / Recycling Bin.
- (Windows only) — Navigate to the C:/Windows/Temp/ directory and scan the contents for files or folders that are taking up a significant amount of space. Any large files or folders here can be deleted to free up space.
Completing Maintenance
- Manually delete all four of the pre-maintenance database files (i.e. those with the "-" suffix).
- Create a .7z archive of the full aACE system including the post-maintenance database files using Keka (Mac) or 7Zip (Windows).
- Name the archive using this format: <YYYY_MM_DD_PartnerAbbr_ClientName>_PostMaintBackup.
- Upload this archive as well as the previously archived pre-maintenance backup using the browser's To aACEsoft bookmark.
Note: If the server does not have this bookmark saved, contact aACE Software. - Restart the server.
After FileMaker Server has restarted and come back online, sign into the aACE system. Navigate to several modules and view multiple records.
Post-Maintenance Cleanup
Each of the post-maintenance files may have a new table added called "Recovered Library". This table may be auto-generated during the file maintenance process. It does not provide any benefit to the aACE system and is safe to delete.
To keep files clean and organized, make sure to delete the Recovered Library table from all applicable files:
- Sign into the hosted aACE system, enter Programmer Mode, then choose to Open Files.
- Navigate to the Data file, open the Manage Database dialog, then switch to the Tables tab.
- Scroll down the list to the tables beginning with "R" and look for a table called "Recovered Library". If you do not find this table, jump to step #5.
- If you do find a table with this name:
- Highlight it and click Delete.
- Mark the flag to Also remove occurrences of these tables in the graph.
- Repeat these steps for each of the files that you performed file maintenance on:
- Data_Logs
- Data_Cache
- Interface
- Scripts
Notifying the Client
After finishing this cleanup task, send an email to the client explaining that file maintenance has been performed successfully and their server and files are back online. Also notify your contact at aACE Software that file maintenance was performed on the specified date for the specified client.
Aborting Maintenance
If the maintenance process is not going to finish by the end of your scheduled block of time, you must abort the process:
- Cancel the current stage of the maintenance process.
- Manually delete the unfinished “aACEv5v0_Data” file (i.e. drag it to the Trash / Recycle Bin).
- Remove the “-” suffix from the original “aACEv5v0_Data“ file and leave it in the Databases folder.
- Restart the server to safely bring the aACE system back online.
Inform the client that the maintenance process was aborted and why. Then schedule a larger block of time for maintenance in the near future.
Creating Compressed .7z Archives
When taking the Pre-Maintenance backup and Post Maintenance backup, we recommend using Keka on Mac servers or 7zip on Windows servers to ensure the integrity of the backups. We use these alternative archiving applications because they are more reliable than the default archiving applications on both Mac and Windows. (The default applications occasionally allow database files stored in the archive to become corrupt and unusable, especially with larger FileMaker databases.)
Keka
- Open Keka and ensure .7z is specified as the archive type and leave the other default settings in place.
- Locate the files you want to archive, then drag-and-drop the entire set onto the Keka window.
The window changes and displays a message that it's ready to compress files. - When you release the files:
- If they were on the desktop, Keka creates a generic named .7z file on the desktop.
- If they were in another folder, Keka displays a prompt to specify the name and location for the .7z file.
7-Zip
Before you create the archive, make sure all the needed files are placed in the same directory.
- Open 7-Zip.
- Locate the files you want to archive, then select the entire set and click Add to [FileName].7z.
- In the Add to Archive window, manage the settings as needed:
- Archive — Name the archive file.
- Archive Format — Ensure that .7z is specified as the archive type.
- Other Settings — Leave the other default settings in place.
- Click OK.
The archive file is created in the same location as the original files unless you manually change the destination folder.