This guide explains how to replace part or all of the current chart of accounts with another set of accounts, typically from a previous software system. It is intended for system administrators.
Preparing to Import a Chart of Accounts
To help ensure that the actual chart of accounts (COA) import goes smoothly, complete these preparation tasks:
- Make sure all the accounts you are importing conform to aACE’s numbering structure.
Please read Understanding aACE Chart of Accounts thoroughly. Use that guide to edit your desired COA so it is consistent with aACE’s expected numbering scheme. - Before importing data into a discovery or test aACE system, we recommend resetting all test transaction data.
Bear in mind that your COA in aACE does not have to be 100% perfect prior to go-live. aACE provides many tools for easily changing the COA and reassigning general ledger entries (see below for details).
Process Overview
Importing a chart of accounts typically includes the following four steps:
- Remove unnecessary accounts
- Resolve accounts that have data or linked records
- Import the new accounts
- Evaluate any remaining underlined accounts
Importing a Chart of Accounts
Step 1: Removing Unnecessary Accounts
Each aACE discovery system includes a default COA so new users can practice working in the system. From the GL Accounts module, review these default accounts and identify those that are unneeded or that conflict with your desired set of accounts, and that have no balance or associated links.
Deactivate and delete as many of these default GL accounts as necessary. You can address these accounts using various methods:
- Use aACE tools to remove many accounts
- Manually remove a few accounts
- Renumber specific accounts so they fit into your desired COA
Be aware that some default accounts might be referenced by other sections of your aACE system. You cannot remove these accounts until any related records have been reassigned to a different GL account. Reassigning these related records is the primary challenge when importing a new COA (see below for details).
Prepare for Full Import Tool
The Prepare for Full Import tool is designed to remove as many default GL accounts as possible and to 'flatten' the COA to the greatest extent possible. Because this process can have a major impact on your aACE system, it requires an authentication code to run. Contact your aACE partner to discuss your needs and obtain the code.
After you have the authentication code, navigate to the GL Accounts list view, then click Admin Actions ( ) > Prepare for Full Import. Enter the authentication code and click Continue.
When this process runs, aACE will:
- Delete every default GL account that it can (i.e. accounts with no links to other records in the system)
- Flatten the COA by deleting header accounts, then assigning all remaining detail accounts to their corresponding root header account
- Renumber any remaining detail accounts to create a concise series in sequential order at the top of each root header account
- Format any remaining account IDs with an underline to help differentiate default accounts from imported accounts
Removing Multiple GL Accounts
aACE provides processes for removing a batch of GL accounts. These processes proceed from the top of a list to the bottom.
- From the GL Accounts module list view, constrain the list to the accounts you wish to delete.
- Sort the list by Account ID in descending order.
aACE cannot deactivate header accounts that have active detail accounts. Sorting the list in descending order enables the system to address detail accounts before reaching the header accounts. This helps reduce the number of iterations required to deactivate these accounts. - Click Actions > Deactivate GL Accounts in List.
aACE displays a confirmation message explaining how many accounts were deactivated and how many accounts could not be deactivated. - Rerun the process until the confirmation message reads "0 accounts were deactivated."
- Constrain the list to show all inactive accounts.
- Click Actions > Delete GL Accounts in List.
Removing a Specific GL Account
From the GL Accounts module, locate the account you wish to delete. Use the line-level Actions ( ) or the detail view Actions to deactivate it. From the detail view, click Delete.
After removing the unused accounts, continue with Step 2 to resolve the remaining accounts.
Step 2: Resolving Accounts Which Have Data or Linked Records
Some existing accounts may be connected to various records in the system. You must address these remaining accounts individually. First, identify what needs to be updated with each GL account, then resolve the connections.
Identify Connections for an Account
Connections to a GL account may include references in the Accounting Preferences module, in various LIC records, or in your tax profiles. In addition, existing transactions may be linked to various GL accounts. To identify current connections, attempt to deactivate the account:
- From a GL account's detail view, click Actions > Deactivate GL Account.
- aACE displays a message explaining why that account could not be deactivated, for example:
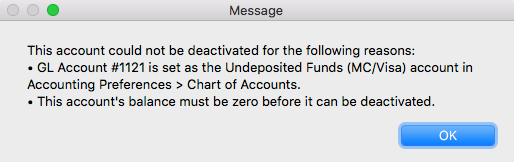

Note: To ensure you see all messages about the account, resize the message box.
Resolve Connections to an Account
Navigate to the various modules linked to the account and remove each connection.
After removing these connections, you can deactivate and delete that specific GL account as described above.
Step 3: Importing the New Accounts
Follow the normal process for importing records to import the new COA. We recommend that you invest some time in polishing the import spreadsheet to ensure the results are correct.
When you import GL accounts, they are initially placed in Pending status. aACE prompts you to activate the records. If you leave them in Pending status, you can activate them later by clicking Actions > Activate GL Accounts in List.
Review the Import
After the import process finishes, compare the updated COA to your import spreadsheet. Confirm that all your needed accounts are now present in the system.
Duplicated Account ID Numbers
The import process allows you to import accounts with the same ID number as existing accounts, duplicating the account record rather than overwriting it. This helps save you time since it is not required to remove duplicated numbers from the COA you're importing. Business workflows can go forward normally even if there are duplicated ID numbers.
This is because only one account with a certain ID number can be active. If you try to activate a GL account that matches the ID of another currently active account, aACE returns an error and leaves the unactivated account in Pending status.
Normally you would delete these duplicates. If needed though, you can deactivate and delete the existing account record, then activate the imported duplicate.
Step 4: Evaluating Underlined Accounts
If you use the Prepare for Full Import process, account IDs that could not be deleted will be underlined. The underlining appears at the GL Accounts module and at other places in the system (e.g. Accounting > Preferences > Chart of Accounts) This helps differentiate these pre-existing accounts from imported accounts.
Often these are accounts that were used in the demo system. Review the underlined accounts to verify whether they should be retained, reused, or deleted. This review process can be particularly valuable as it often highlights additional important features in your aACE system.
Remove Underline Formatting
If you need to retain one of the underlined accounts, you can remove the underline formatting. At the GL Accounts module, display the detail view for that account. Click Edit, then right-click in the Account Number field and select Style > Plain Text.
Correcting / Updating Your COA Post Go-Live
As noted above, your aACE system does not need a perfect COA before go-live. It includes tools that make it simple to update your general ledger records after importing a new COA.
Reassign Transactions to Another GL Account
You can reassign posted transactions to another GL account (i.e. from a default account to an imported account). This can only be done with an open accounting period.
Reassigning the GL Account from the Related LICs
You can update your GL account assignments for general ledger records from the related LICs. This means that before go-live it's a higher priority to set up your LICs than to perfect your COA.
After you import a new COA, you can use the following process to update the general ledger records without requiring manual general journal entries:
- Update your LICs accounting setup, assigning the imported GL accounts for the revenue, cost, and inventory accounts:
- At the LICs module, filter the list view to display all LICs that will share a revenue account.
- Click Admin Actions (
 ) > Update Revenue Acct for Line Item Codes in List.
 - Select the new GL account for revenue.
- Repeat these steps for the Cost Acct and Inventory Acct, then continue updating other LICs.
- Navigate to the General Ledger module.
- Filter the list view to display general ledger records that need to be updated (i.e. those for an LIC that you assigned a new account).
- Click Actions > Reassign GL Acct from Line Item Codes.
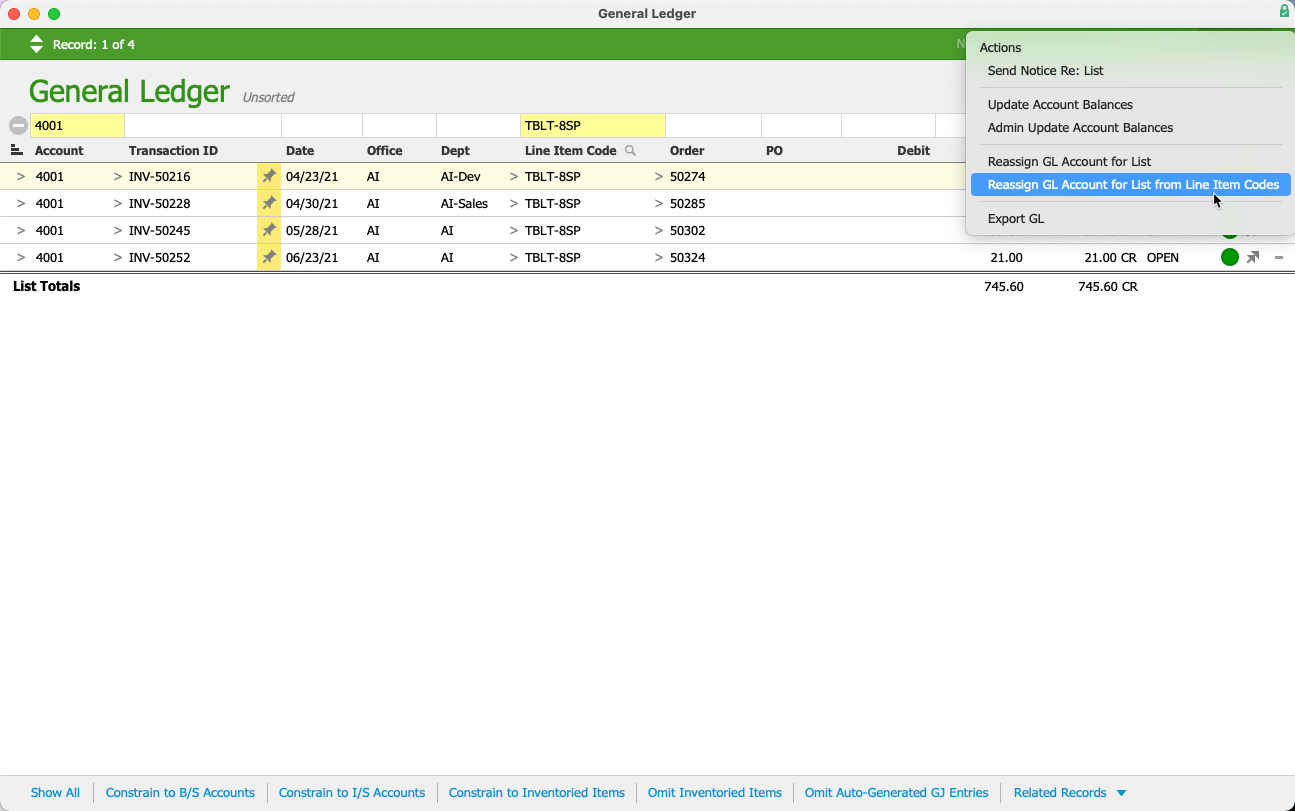
- At the confirmation dialog, click Update.
 ) > Update Revenue Acct for Line Item Codes in List.
Read more details about reassigning the GL account based on the LIC.