The Time Clock enables team members to log and track their time in real-time throughout the day. Time entries are linked to existing jobs and tasks that reference existing line item codes. aACE uses this info to generate and populate timesheets.
Display the Time Clock by clicking the Main Menu icon for this tool ( ):
):
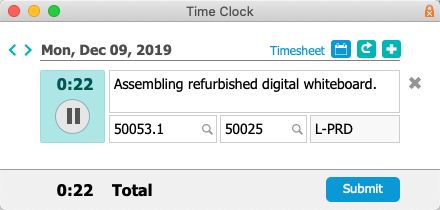
When the Time Clock opens, it automatically creates a blank time entry block and begins accruing time. The blue highlight around the Pause button means time is accumulating. Clicking the Pause button removes that highlight and changes the button to a Play icon ( ). (Note: When you open the Time Clock, aACE also automatically creates a linked timesheet. Updates in the Time Clock are reflected on the timesheet record.)
You can manually edit the time (e.g. if you forget to stop or start the clock). With the clock stopped, click the hour/minutes numbers. In the dialog, enter positive numbers to add time or enter negative numbers to reduce it.
After the day ends, the time entry blocks for that day cannot be changed in the Time Clock. Any additional editing must be handled from the Timesheets module. (Note: On the web, submitting the timesheet locks it from additional editing.)
Working with Jobs, Tasks, and LICs
Enter the job, task, and line item code (LIC) information:
- If the user's Team Member record includes a default LIC, that LIC is auto-populated when the time entry is created.
- In the Jobs and Tasks fields, drop-down lists show recently selected jobs and any open tasks linked to a selected job.
- Locate new jobs and tasks by clicking the Search icon (
 ).
). - LICs linked to a selected task are auto-populated when you select that task.
- Auto-populated tasks and LICs can be changed manually.
- Changing a job will update the current task (and changing the task will also update the job).
 ).
).The text box for notes is an optional field where you can record details about your work.
Working with Other Time Clock Features
On the Time Clock, you can also:
- Create new time entry blocks — Click the Plus icon at the top. The clock automatically begins tracking time on the new block. (Note: New time entry blocks cannot be created for past dates.)
- Delete time entry blocks — Stop the clock, then click the Delete icon at the right of the block. Any accumulated time in that block is subtracted from the total.
- Submit the timesheet — Clicking the Submit button moves the timesheet to Submitted status to be approved and prevents further edits through the Time Clock.
- View the timesheet — Click the "Timesheet" link to open the detail view in the Timesheets module.
Configuring Your System to Use the Time Clock
The system administrator must make sure there is a valid accounting period by activating the required automation schedule: Menu > Sys Admin > Preferences > Automation Schedules > Update Current Period/Fiscal Year.
Using the Time Clock effectively also requires a network of jobs, tasks, and LICs.