This guide explains the steps to configure your aACE system for integration with AvaTax services. It is intended for system administrators.
Before configuring your system for the aACE+ AvaTax Integration to calculate tax values, you should be familiar with aACE's tax profile functionality. AvaTax integration can work with your tax profiles in various ways:
- A single tax profile can be set as the default for all orders to rely on AvaTax exclusively.
- Specific tax profiles can be set up for all states where you have nexus, drawing tax rates from AvaTax.
- Additional tax profiles can be set up for jurisdictions where you are not responsible for collecting sales tax. These tax profiles should be set to 0% to prevent unnecessary requests to AvaTax. This helps reduce the expense of your AvaTax subscription.
Note: AvaTax also provides functionality to file your state taxes, which may affect your decisions for configuring this integration.
Steps for AvaTax Integration
aACE+ Avalara AvaTax integration addresses your sales tax challenges with a cloud-based service that calculates sales and use tax, manages exemption certificates, files returns, and remits payments across North America and beyond.
For your aACE+ AvaTax integration, proceed with the following steps:
- Create your AvaTax account
- Configure aACE accounting preferences
- Configure aACE office settings
- Configure aACE line item code settings
- Configure aACE tax profiles
Note: The purpose of this process is to help ensure you are not charged for unneeded tax data requests. Avalara charges for each request that is submitted. If a certain office, line item code, or tax profile should not be taxed, there is no need to request tax data for it. The time you invest in configuring your AvaTax integration can reduce your expenses.
1. Creating an AvaTax Account
Contact an Avalara representative to set up your AvaTax account at www.avalara.com. Explain that you require an "aACE Connector". Your account rep will provide this and other details on how to create your account and obtain the needed credentials.
Note: After you receive your credentials (e.g. account number, license key, service URL, etc), keep the information secured. You will use it later in setting up your aACE+ AvaTax integration.
2. Configuring Accounting Preferences
To enter your AvaTax credentials and basic setup information, navigate from Main Menu > Accounting > Preferences > AvaTax.

- Enable AvaTax — Mark this flag to set other integration details.
- Test Button — After entering your credentials, you can click this button to verify your connection.
- Test Mode — If you are working with aACEsoft in a sandbox environment, you may need to activate Test Mode. Otherwise, leave this flag cleared. Test mode will not correctly access an AvaTax production account.
- Account Number, License Key, and URL — Enter the Account Number, License Key, and URL provided by your Avalara rep.
- Enable logging — Only mark this flag if you are troubleshooting issues with AvaTax. When activated, aACE will store a complete log of the raw request sent to AvaTax and raw data sent in response.
- Disable address validation — Mark this flag to turn off automatic address validation when creating or updating applicable records (i.e. companies, orders, invoices, etc).
Note: With automatic address validation enabled, you can still manually validate an address. - Disable tax calculation — Mark this flag to turn off automatic tax calculations when saving orders and invoices.
- Use tax codes from order when invoicing — Mark this flag to pull the AvaTax code from the related order item instead of the line item code (LIC). This keeps the tax codes consistent between the order and the invoice, even if the LIC settings change between when an order is placed and when it is fulfilled.
- Filter Address Validation by Country — A return-delimited list of all countries that should be included in the address validation feature. If a country is not on this list, it will not be included in automatic or manual address validation.
Note: If you encounter difficulties with connecting to AvaTax, contact your Avalara rep.
3. Configuring Offices
You can set up multiple business entities to access your AvaTax account. aACE 'office' records correspond to AvaTax 'company' records. Note: This does not use your AvaTax Company ID. Instead, your Company Code can be found by logging in to your AvaTax portal and navigating to Company Settings.
After you have your AvaTax Company Code, navigate in aACE from Main Menu > Internal > Offices, locate the desired office record, then enter the AvaTax Company Code in the AvaTax Co Code field:
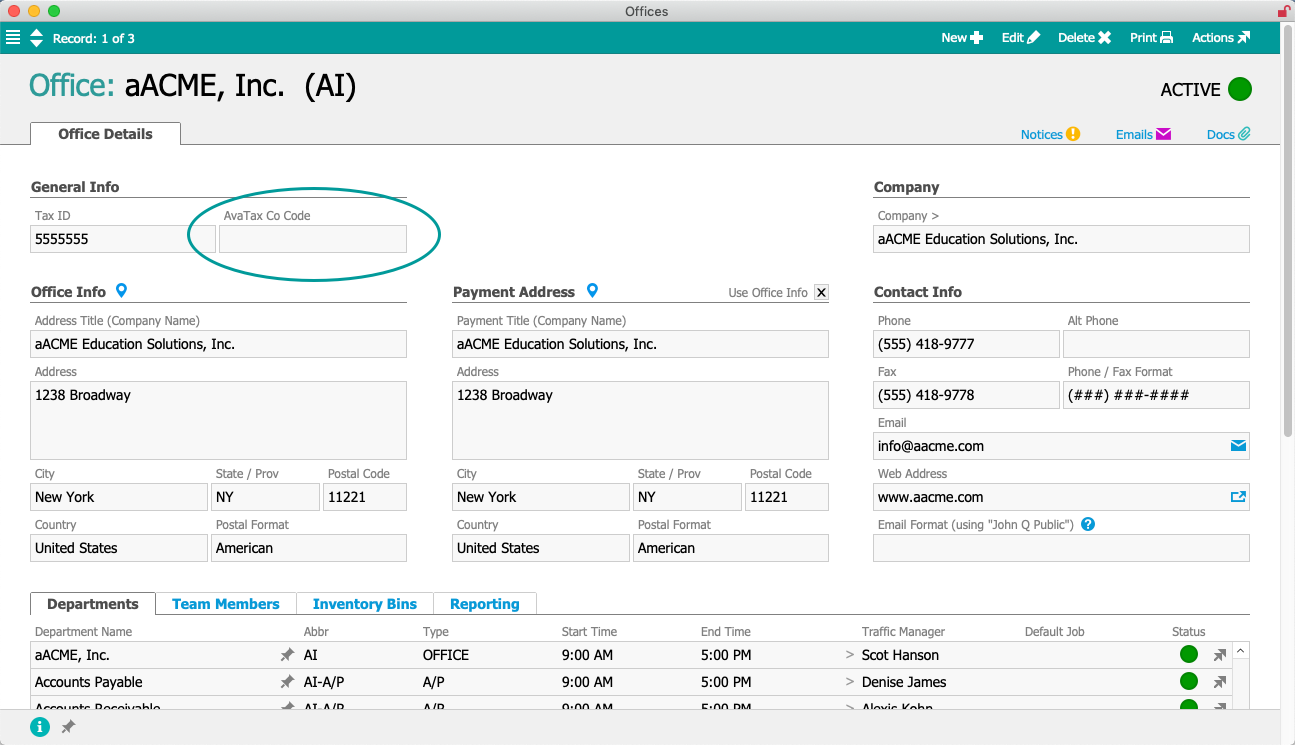
Note: To reduce expenses, if one of your business entities does not collect taxes, do not enter an AvaTax Company Code for it.
4. Configuring Line Item Codes
You must enable AvaTax for each LIC that should have sales tax automatically calculated.
Navigate from Main Menu > Order Setup > Line Item Codes. In the Preferences section for each applicable LIC, mark the flag to Enable AvaTax:

You can also set a tax code that AvaTax will use to calculate tax rates for basic users. (For details, contact your Avalara rep.)
System administrators can update these settings for a batch of LICs:
- At the Line Item Codes module, use the Quick Search bar to locate all the LICs you need to update.
- In the footer, click the Admin Actions icon (
 ).
).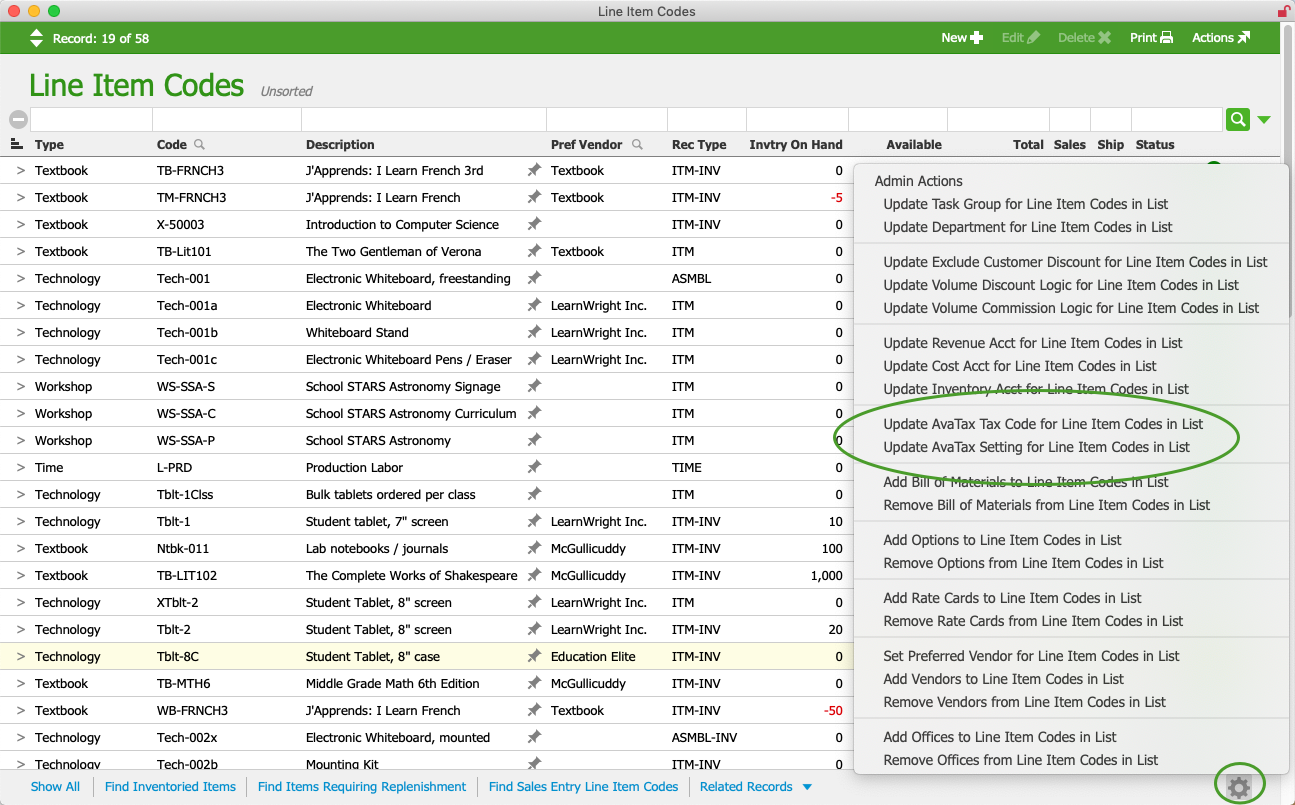
- Click the link for the desired update:
- Update AvaTax Tax Code for Line Item Codes in List — This leverages the import process to update LICs. You can prepare an Excel spreadsheet with specific tax codes you receive from your Avalara rep, then import that data to modify the current records.
- Update AvaTax Setting for Line Item Codes in List — This changes the Enable AvaTax preference for all LICs currently listed. Click Y-True to mark this flag or click Y-False to clear this flag.

Note: To reduce your expenses, if certain LICs do not require sales tax, do not enable the AvaTax preference for them.
5. Configuring Tax Profiles
aACE tax profiles can be set up in different ways depending on your business needs. Navigate from Main Menu > Accounting > Tax Profiles, then locate the desired tax profile.

Any record linked to a tax profile that has the AvaTax flag marked will be processed through AvaTax. Make sure the tax profile is linked to an appropriate GL Account to receive the tax values that come back from AvaTax.
The simplest implementation is often to have a single, default tax profile with AvaTax enabled, but additional tax profiles can be useful if:
- You want the tax values calculated by AvaTax to be tracked in the general ledger (GL) using various criteria. For example, you may want a different GL Account for taxes for each state you do business in. This would require setting up a tax profile for each of these states.
- You want the AvaTax tax calculation to be disabled for a certain group of companies, such as jurisdictions for which your AvaTax account is not set up to calculate.